Configuring the project
All security sensitive information is passed as a secret in our configuration. We have a library called Ensono.Stacks.Configuration that reads secrets from the environment before the application starts and makes the needed substitutions in the configuration files.
Configuring Cosmos DB
The project can be set to use Azure Cosmos DB or an InMemory database to store the example application data. The InMemory database works out of the box and no further setup is required aside from creating your project. Depending on your desired setup you'll have to provide some or all of the configuration in the appsettings.json file section showed below.
"CosmosDb": {
	"DatabaseAccountUri": "<Add CosmosDB Account URI here>",
	"DatabaseName": "Stacks",
	"SecurityKeySecret": {
		"Identifier": "COSMOSDB_KEY",
	...
	}
}
Using the Cosmos DB Emulator to run the database locally
For running on local environments (Windows/Linux/macOS) please follow the instructions provided by Microsoft.
-
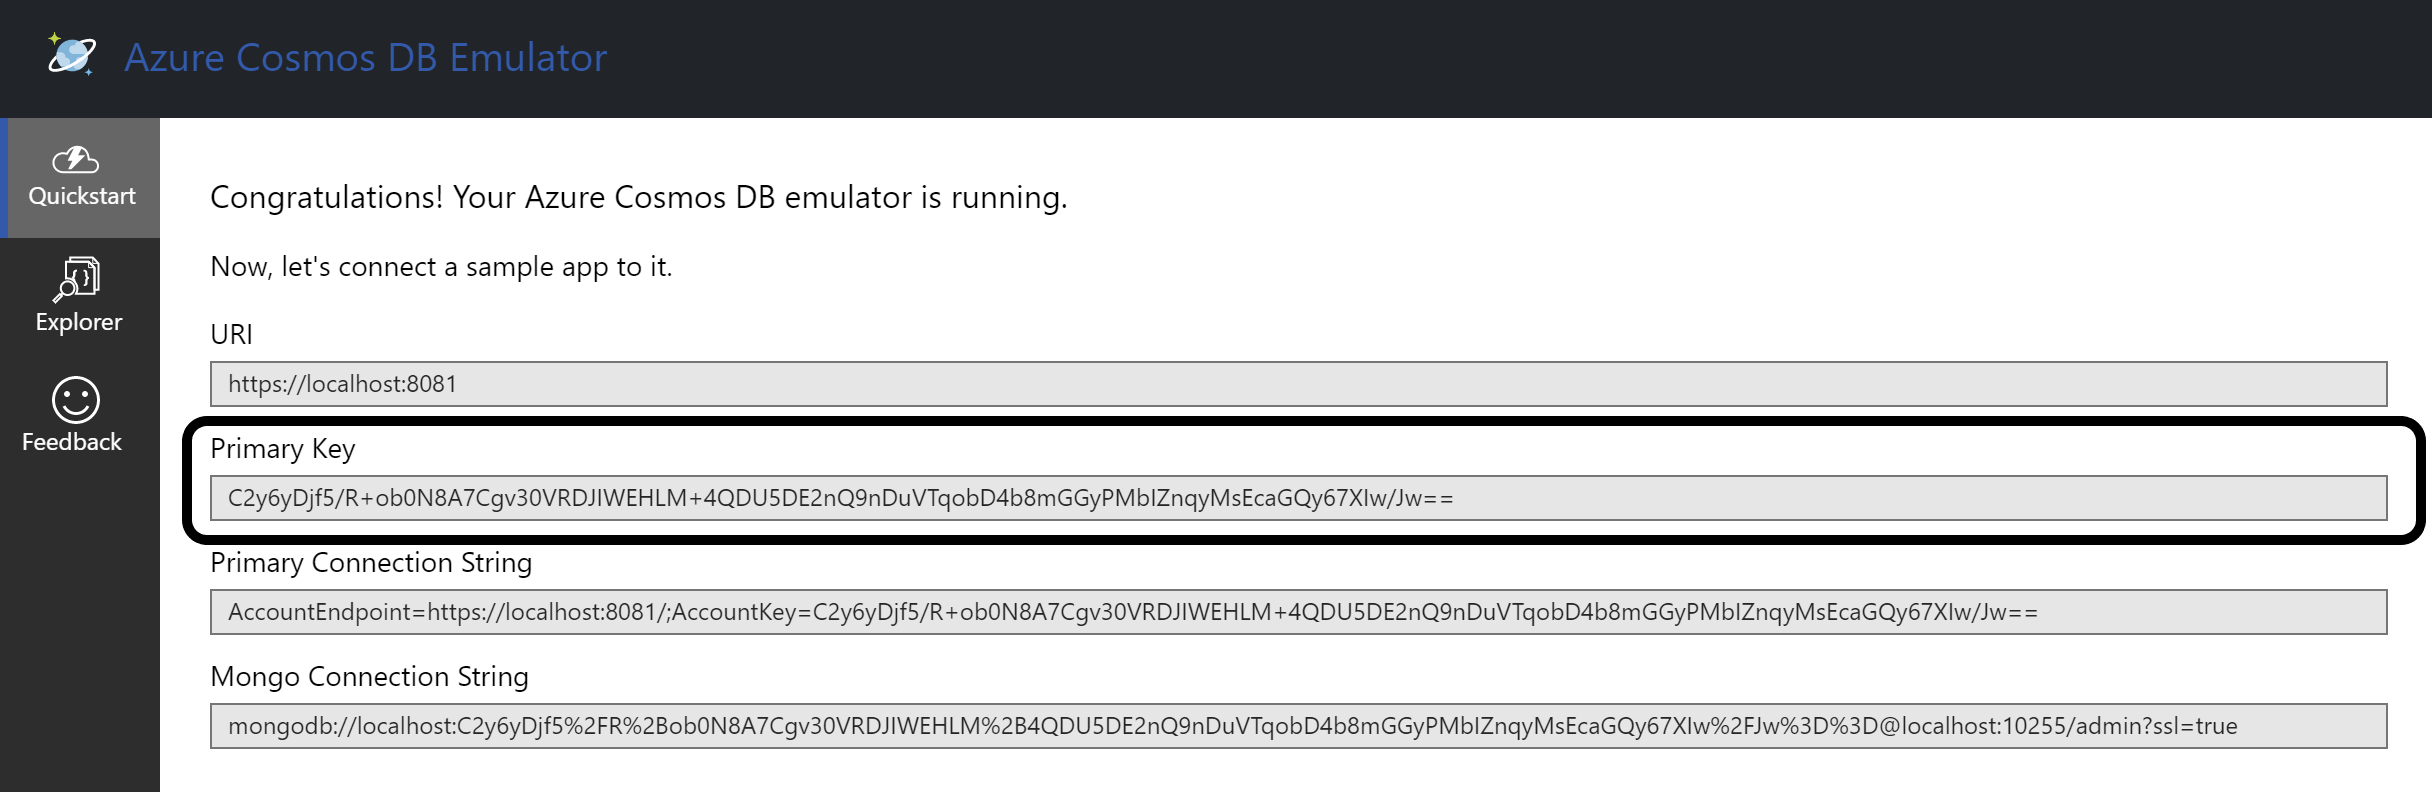
Navigate to the local Cosmos DB URL in your browser as indicated in the documentation given in the above link.
-
Identify the Primary Key. Please refer to the field in the screenshot below.
-
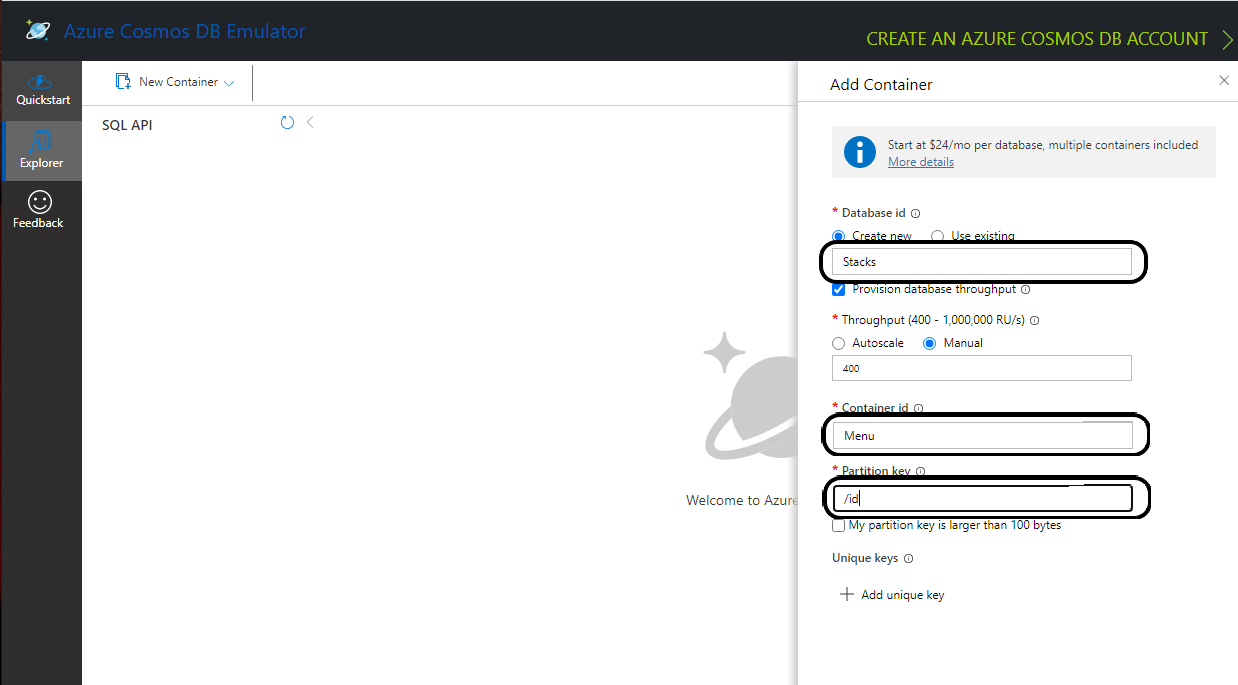
Cosmos DB has to contain a fixed structure depending on your project. Create a collection
Stacks(this corresponds toDatabaseNamein theappsettings.jsonfile) with a container idMenu(name of domain object) and the partition key/id. Keep in mind that if you've changed the domain (default beingMenu), you have to supply your own domain when creating the container.
To interact with CosmosDb there is a environment variable called COSMOSDB_KEY that needs to be set before running your application. This variable holds the value of the Primary Key you got from step 2. Please see the next section on details of how to set it on your machine.
Setting the COSMOSDB_KEY environment variable
- Windows
- Unix
There are a couple of different ways to set the environment variable
Using Powershell for COSMOSDB_KEY
You can use Powershell with administrator privileges to execute the command below. Substitute <PRIMARY-KEY-HERE> with your own key.
[Environment]::SetEnvironmentVariable("COSMOSDB_KEY", "<PRIMARY-KEY-HERE>", [EnvironmentVariableTarget]::Machine)
Using Visual Studio for COSMOSDB_KEY
-
Open the project in Visual Studio. The solution file is located at
src/api/xxENSONOxx.xxSTACKSxx.API.sln. -
Add COSMOSDB_KEY environment variable to the launchSettings.json file generated by Visual Studio and add the Cosmos DB Primary Key value.
{
  ...
  "profiles": {
    "xxENSONOxx.xxSTACKSxx.API": {
      "environmentVariables": {
        "ASPNETCORE_ENVIRONMENT": "Development",
        "COSMOSDB_KEY": "<PRIMARY-KEY-HERE>"
        ...
      }
    }
  }
}
Using VSCode for COSMOSDB_KEY
If you're using VSCode that means you'll have a launch.json file generated when you try to run the project. In that file there's an env section where you can put environment variables for the current session.
"env": {
	...
    "COSMOSDB_KEY": "<PRIMARY-KEY-HERE>",
    ...
}
The variable is referenced in appsettings.json. As mentioned in the beginning section of this page this environment variable name will be substituted with the actual value on startup.
"CosmosDb": {
    ...
    "SecurityKeySecret": {
        "Identifier": "COSMOSDB_KEY",
        ...
    }
}
There are a couple of different ways to set the environment variable
Using terminal for COSMOSDB_KEY
You can use the terminal to execute the command below. Substitute <PRIMARY-KEY-HERE> with your own key. This will set the environment variable only for the current session of your terminal.
export COSMOSDB_KEY=<PRIMARY-KEY-HERE>
To set the environment variable permanently on your system you'll have to edit your bash_profile or .zshenv file depending on which shell are you using.
echo 'export COSMOSDB_KEY=<PRIMARY-KEY-HERE>' >> ~/.zshenv
Using Visual Studio Code for COSMOSDB_KEY
If you're using VSCode that means you'll have a launch.json file generated when you try to run the project. In that file there's an env section where you can put environment variables for the current session.
"env": {
	...
    "COSMOSDB_KEY": "<PRIMARY-KEY-HERE>",
    ...
}
The variable is referenced in appsettings.json. As mentioned in the beginning section of this page this environment variable name will be substituted with the actual value on startup.
"CosmosDb": {
    ...
    "SecurityKeySecret": {
        "Identifier": "COSMOSDB_KEY",
        ...
    }
}
Connecting to deployed Cosmos DB instance
When choosing not to run the CosmosDB locally via the emulator, further configuration needs to be changed in the appsettings.json file.
Aside from setting the COSMOSDB_KEY as an environment variable (described in the previous section), you'll have to set the CosmosDB URI parameter DatabaseAccountUri as well.
"CosmosDb": {
	"DatabaseAccountUri": "<Add CosmosDB Account URI here>",
	"DatabaseName": "Stacks",
	"SecurityKeySecret": {
		"Identifier": "COSMOSDB_KEY",
	...
	}
}
Configuring DynamoDB
You need a DynamoDB instance in order to connect the API to it. You can follow the official instructions provided by AWS here.
Relevant documentation pages that you can follow to set up your profile:
The template and NuGet package assumes you'll use the AWS CLI tools and will have configured your access keys via the aws configure command.
Depending on your desired setup you'll have to provide some or all of the configuration in the appsettings.json file section showed below.
"DynamoDb": {
    "TableName": "Menu",
    "TablePrefix": ""
}
Ensono.Stacks.DynamoDB package
This template uses the Ensono.Stacks.DynamoDB package to connect and use DynamoDB.
Configuring AWS SNS
The project can be set to use AWS SNS to publish and consume events. In order to publish messages to a Queue you will also require a version of AWS SQS running on AWS cloud. For SNS to work out the box with AWS you will have to provide some configuration in the appsettings.json file section showed below as well as subscribeaing your SNS topic to your SQS queue.
You will also be required to set the TOPIC_ARN as an environment variable (see section Setting the TOPIC_ARN environment variable).
"AwsSnsConfiguration": {
  "TopicArn": {
		"Identifier": "TOPIC_ARN",
	...
	}
},
"AWS": {
    "Region": "eu-west-2"
}
Using the AWS SNS to publish messages
For running on local environments you will still require a version of AWS SNS running on AWS cloud.
-
Navigate to the SNS Topic in your browser.
-
Identify the TopicArn. This is located within: Amazon SNS --> Topics --> topic-name (e.g. stacks-dev) --> TopicArn
-
Apply the TopicArn obtained to the environmental variable called
TOPIC_ARN(Please see the next section on details of how to set it on your machine). -
Run your application and carry out some event worth actions (create domain objects, retrieve domain objects, delete domain objects etc...). Any time you carry out an action which should raise an event, there will be an event raised within your AWS SQS queue.
-
Navigate to the SQS Queue in your browser and select
Send and receive messages. SelectPoll for messagesand see all the events raised.
Setting the TOPIC_ARN environment variable
- Windows
- Unix
There are a couple of different ways to set the environment variable
Using Powershell for TOPIC_ARN
You can use Powershell with administrator privileges to execute the command below. Substitute <TOPIC-ARN-HERE> with your own key.
[Environment]::SetEnvironmentVariable("TOPIC_ARN", "<TOPIC-ARN-HERE>", [EnvironmentVariableTarget]::Machine)
Using Visual Studio for TOPIC_ARN
-
Open the project in Visual Studio. The solution file is located at
src/api/xxENSONOxx.xxSTACKSxx.API.sln. -
Add TOPIC_ARN environment variable to the launchSettings.json file generated by Visual Studio and add the SNS topic ARN value.
{
  ...
  "profiles": {
    "xxENSONOxx.xxSTACKSxx.API": {
      "environmentVariables": {
        "ASPNETCORE_ENVIRONMENT": "Development",
        "TOPIC_ARN": "<TOPIC-ARN-HERE>"
        ...
      }
    }
  }
}
Using VSCode for TOPIC_ARN
If you're using VSCode that means you'll have a launch.json file generated when you try to run the project. In that file there's an env section where you can put environment variables for the current session.
"env": {
	...
    "TOPIC_ARN": "<TOPIC-ARN-HERE>",
    ...
}
The variable is referenced in appsettings.json. As mentioned in the beginning section of this page this environment variable name will be substituted with the actual value on startup.
"AwsSnsConfiguration": {
  "TopicArn": {
		"Identifier": "TOPIC_ARN",
	...
	}
}
There are a couple of different ways to set the environment variable
Using terminal for TOPIC_ARN
You can use the terminal to execute the command below. Substitute <TOPIC-ARN-HERE> with your own key. This will set the environment variable only for the current session of your terminal.
export TOPIC_ARN=<TOPIC-ARN-HERE>
To set the environment variable permanently on your system you'll have to edit your bash_profile or .zshenv file depending on which shell are you using.
echo 'export TOPIC_ARN=<TOPIC-ARN-HERE>' >> ~/.zshenv
Using Visual Studio Code for TOPIC_ARN
If you're using VSCode that means you'll have a launch.json file generated when you try to run the project. In that file there's an env section where you can put environment variables for the current session.
"env": {
	...
    "TOPIC_ARN": "<TOPIC-ARN-HERE>",
    ...
}
The variable is referenced in appsettings.json. As mentioned in the beginning section of this page this environment variable name will be substituted with the actual value on startup.
"AwsSnsConfiguration": {
  "TopicArn": {
		"Identifier": "TOPIC_ARN",
	...
	}
}