Testing with Playwright
Playwright is a relatively new testing framework, which is developed and supported by Microsoft. Playwright was designed to enable cross-browser web automation that is reliable and fast, with support for multiple browsers, programming languages and test runners. With a vast array of growing capabilities, alongside Microsoft backing, we are supporting and recommending it as a test framework within Ensono Stacks!
Getting Started
Upon scaffolding your application with the playwright testing framework, you will be presented with an example test suite and playwright configuration. The @nx/playwright NX plugin is used as a base for the Playwright/NX integration.
Playwright Configuration
Base configuration
The base configuration has been created with CI in mind, meaning the default configuration (shared across all projects) considers requirements for reporting and pipeline efficiency out of the box!
import { PlaywrightTestConfig } from '@playwright/test';

const baseURL = process.env.BASE_URL || 'http://localhost:4200/';
const appName = process.env.NX_TASK_TARGET_PROJECT || 'test-project';
const outputFolderForProject = process.env.CI ? '../../test-results/' + appName : 'test-results';

export const baseConfig: PlaywrightTestConfig = {
  /* Run tests in files in parallel */
  fullyParallel: true,
  /* Fail the build on CI if you accidentally left test.only in the source code. */
  forbidOnly: !!process.env.CI,
  /* Retry on CI only */
  retries: process.env.CI ? 2 : undefined,
  /* Max failures in CI to fail fast */
  maxFailures: process.env.CI ? 10 : undefined,
  /* Timeout for each test in ms */
  timeout: 30000,
  /* The output directory for files created during test execution. */
  outputDir: outputFolderForProject,
  /* Reporter to use. */
  reporter: process.env.CI
    ? [
        ['dot'],
        ['html', { open: 'never', outputFolder: outputFolderForProject.concat('/html-report') } ],
        ['junit', { outputFile: outputFolderForProject.concat('/', appName, '.xml') }],
      ]
    : 'list',
  use: {
    baseURL,
  },
};
Project based configuration
Individual project configuration has been created with our own recommendations to get the most out of playwright’s capabilities, targeting multiple browsers and devices. From this example, you can tailor it to suit your specific needs! See the docs for more information!
import { type PlaywrightTestConfig, devices } from '@playwright/test';
//Extends the base configuration for playwright which is shared across all projects
import { baseConfig } from '../../playwright.config.base';

//Configuration unique to the current application tests
const config: PlaywrightTestConfig = {
  ...baseConfig,
  use: {
    ...baseConfig.use,
    screenshot: 'only-on-failure',
    trace: 'retain-on-failure',
  },

  /* Test against multiple browsers */
  projects: [
    {
      name: 'chromium',
      use: {
        ...devices['Desktop Chrome'],
      },
    },
    {
      name: 'firefox',
      use: {
        ...devices['Desktop Firefox'],
      },
    },

    {
      name: 'webkit',
      use: {
        ...devices['Desktop Safari'],
      },
    },

    /* Test against mobile viewports. */
    {
      name: 'Mobile Chrome',
      use: {
        ...devices['Pixel 5'],
      },
    },
    {
      name: 'Mobile Safari',
      use: {
        ...devices['iPhone 12'],
      },
    },
  ],
};

export default config;
Browsers and Devices
The scaffolded project configuration by default uses Desktop Chrome, Firefox and WebKit. Upon package install or test execution Playwright will automatically install the browsers defined within the running project. Other browsers are available, such as Microsoft Edge and HiDPI browsers. Additionally, the scaffolded project configuration contains two examples for mobile devices, Mobile Chrome on the Pixel 5, and WebKit on the iPhone 12.
Playwright has an extensive library of browsers and devices which can be found in the device descriptors list. An example of a mobile emulation device is found below, showcasing how Playwright emulates the devices through userAgent and viewport configuration, alongside mobile properties such as isMobile/hasTouch. By default, each emulated device will have a defaultBrowserType, in this example the iPhone12 uses WebKit.
"iPhone 12": {
    "userAgent": "Mozilla/5.0 (iPhone; CPU iPhone OS 14_4 like Mac OS X) AppleWebKit/605.1.15 (KHTML, like Gecko) Version/16.4 Mobile/15E148 Safari/604.1",
    "screen": {
      "width": 390,
      "height": 844
    },
    "viewport": {
      "width": 390,
      "height": 664
    },
    "deviceScaleFactor": 3,
    "isMobile": true,
    "hasTouch": true,
    "defaultBrowserType": "webkit"
  }
Testing
Writing tests
When building your playwright tests it helps to have a version of the application deployed for capturing locators and verifying your tests function as intended.
You can serve your required application to localhost on port 4200 through the following command:
nx serve <app-name>
NX will then build and host your application, from here you can build/run your tests against a usable version of the application
nx serve next-app

> nx run next-app:serve:development

  info  - automatically enabled Fast Refresh for 1 custom loader
  event - compiled client and server successfully in 8.5s (166 modules)
  [ ready ] on http://localhost:4200
Running your playwright tests
Using NX we can very easily run our tests, either for a specific project, or against any affected projects. NX will handle provisioning and tearing down of the web server automatically! Using the NX ‘affected’ capability allows you to run only the tests within a mono repo where the codebase has changes since the ‘master’ commit. (See the docs for more information)
- Current
- Affected
nx e2e example-test-project-e2e
nx affected:e2e
Run specific tests
Looking at the following example, we have tagged the test with @smoke-test within the test case name
test('App should be up and running @smoke-test', async ({ page }) => {
    const status: string = await page.locator('#hero >> span').textContent();
    expect(status).toBe("You're up and running");
});
To run specific this specific test you can use the grep parameter alongside your run command, similarly, if multiple tests contain @smoke-test within their name, they will also be executed
nx e2e example-test-project-e2e --grep @smoke-test
Testing Output
Viewing your test results
Playwright has many configuration options for test reporting which can be found in the documentation.
Locally
Using the scaffolded base configuration all test results will be output to the terminal using Playwrights list reporter, an example output can be seen below:
Running 30 tests using 8 workers

  ✓  3 [chromium] › src\example.spec.ts:23:3 › Playwright example tests @example-playwright › App should have 5 learning materials (7s)
  -  4 [chromium] › src\example.spec.ts:39:3 › Playwright example tests @example-playwright › NX logo should be hidden on mobile
  ✓  1 [chromium] › src\example.spec.ts:11:3 › Playwright example tests @example-playwright › clicking whats next should take the user to the next steps part of the page (7s)
  ✓  2 [chromium] › src\example.spec.ts:18:3 › Playwright example tests @example-playwright › App should be up and running (7s)
  ✓  6 [chromium] › src\example.spec.ts:49:3 › Playwright example tests @example-playwright › NX logo should be visible on desktop (7s)
  ✓  5 [chromium] › src\example.spec.ts:27:3 › Playwright example tests @example-playwright › Clicking next steps should display information (7s)
  ✓  7 [firefox] › src\example.spec.ts:18:3 › Playwright example tests @example-playwright › App should be up and running (7s)
  ✓  8 [firefox] › src\example.spec.ts:11:3 › Playwright example tests @example-playwright › clicking whats next should take the user to the next steps part of the page (7s)
  ✓  10 [webkit] › src\example.spec.ts:11:3 › Playwright example tests @example-playwright › clicking whats next should take the user to the next steps part of the page (8s)
  ✓  29 [Mobile Safari] › src\example.spec.ts:39:3 › Playwright example tests @example-playwright › NX logo should be hidden on mobile (3s)
  -  30 [Mobile Safari] › src\example.spec.ts:49:3 › Playwright example tests @example-playwright › NX logo should be visible on desktop
  ✓  28 [Mobile Safari] › src\example.spec.ts:27:3 › Playwright example tests @example-playwright › Clicking next steps should display information (4s)


  5 skipped
  25 passed (55s)
Done in 56.75s.
One recommendation for running locally is to utilise HTML reports, a visual report on the status of all executed tests. When viewing HTML reports, all artefacts such as screenshots can be found in one place, alongside trace reports which are very useful in debugging tests post execution.
To change the reporter being used locally you can amend the playwright.config.ts or alternatively through the CLI. Through both options you can also enable the trace viewer:
nx e2e next-js-app-e2e --reporter=html --trace on
Output in CI
If your test project and application has been scaffolded with infrastructure (@ensono-stacks/workspace:init and @ensono-stacks/next:infrastructure) the @ensono-stacks/playwright:init generator will add e2e tasks to your taskctl.yaml file.
Upon a pull request being made this will automatically trigger a build pipeline for your application whereby the e2e test project will be ran.
As defined in the base configuration all test artefacts are output to test-results/<app-name\>
When running in the CI three reporters are utilised:
- dot: Produces a single character per successful test run, keeping detail concise for CI reporting.
- html: A self-contained folder that contains report for the test run that can be served as a web page. Output to
test-results/<app-name\>/html-report. - junit: A JUnit-style xml report which can be fed back into CI reports on the test run. Output to
test-results/<app-name\>/<app-name\>.xml
Build summary: You can view a summary of your build by viewing the pipeline which was ran upon pull request creation.
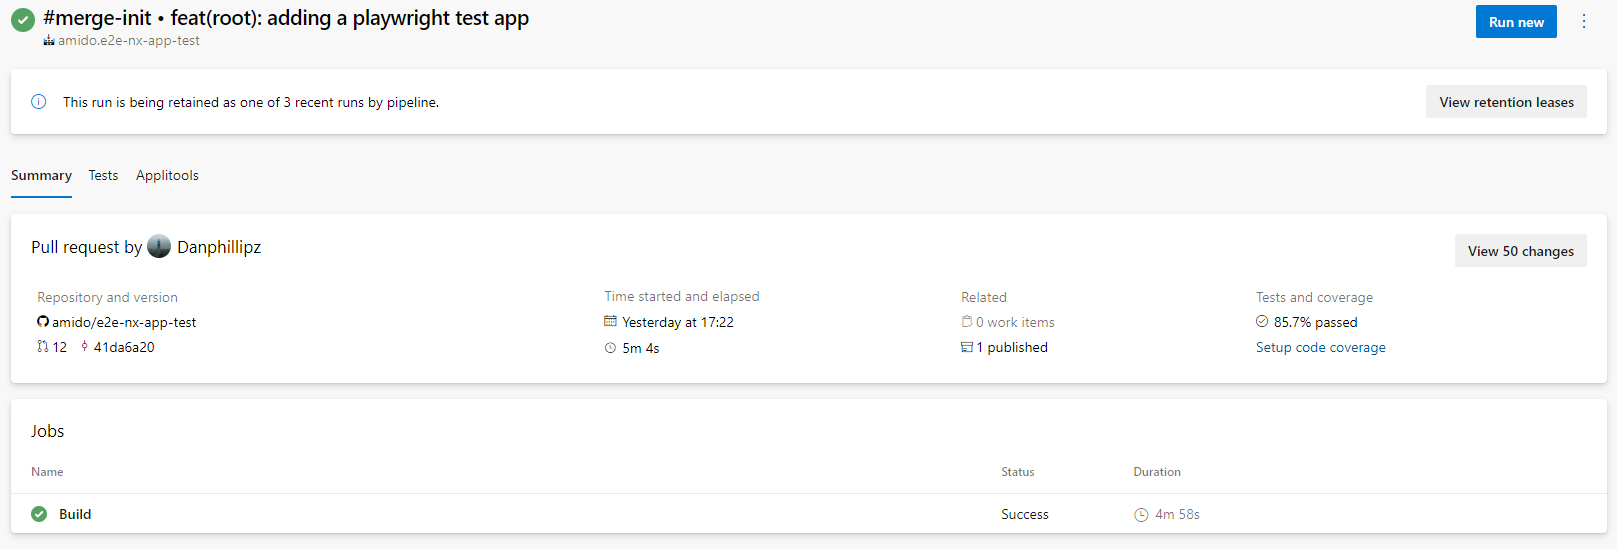
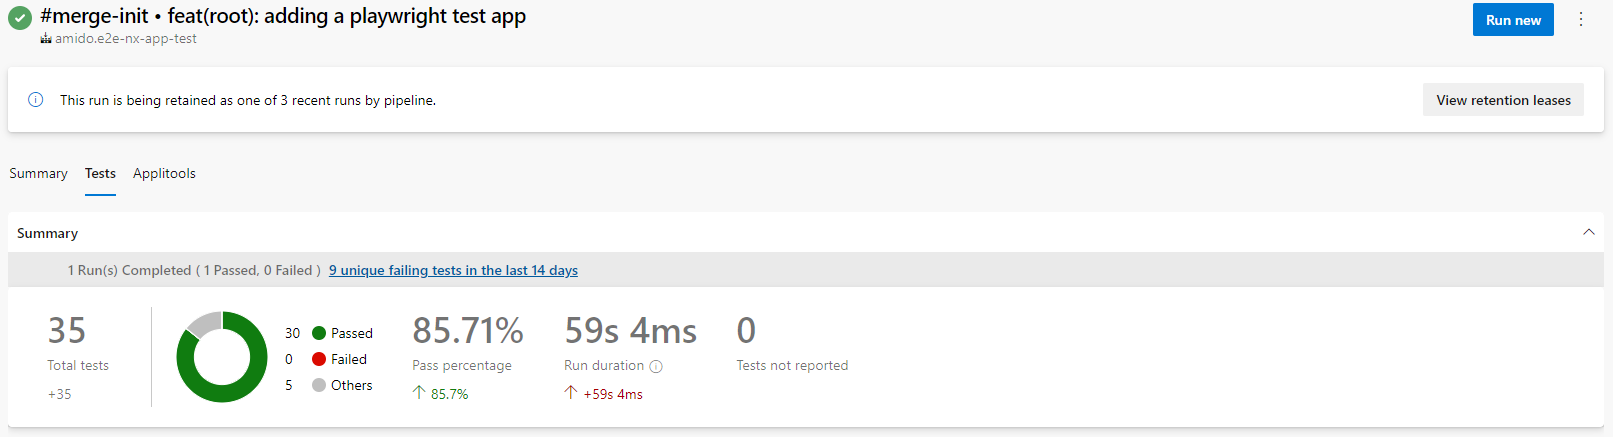
Test results: As part of your generated pipelines test results will be automatically displayed within the summary tab for the build.
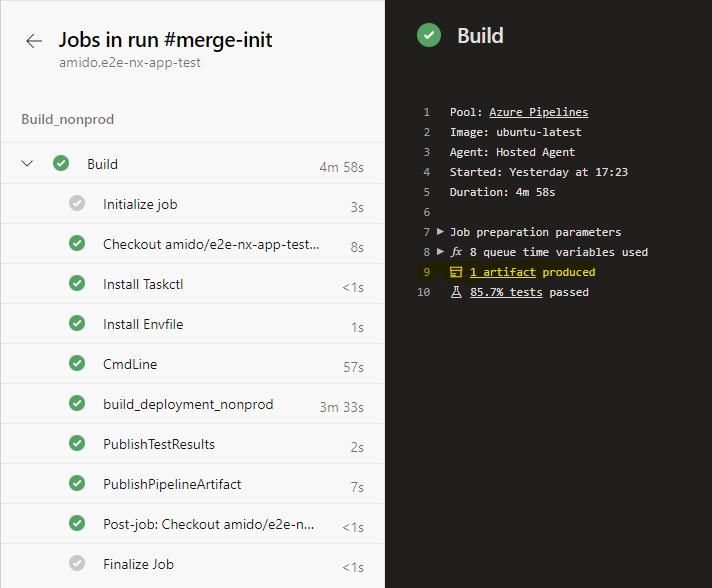
Test artefacts: To download the test artefacts captured by playwright select the build job on the summary page, within the build log click on the 'artefact produced' link, from here you can then download the 'testresults' folder for the test run.
When downloading/viewing HTML reports uploaded as test artefacts to your pipeline, you may experience issues opening trace views as these must be loaded over http:// or https:// protocols, we recommend copying the 'testresult' folder into your local workspace and then using npx playwright show-report 'html-report path' to serve the report to localhost